
Heel toevallig kwam ik deze 2 shirts tegen waar met allebei wel iets was. Het shirt met stipjes was te klein, maar ik bewaarde het vanwege de leuke hals en leuke herinneringen. Van het andere shirt vond ik de hals te ruim en de oranje bloem te opvallend. Omdat de kleuren zo goed elkaar pasten, kwam ineens een idee in me op. Ik kon van deze shirts gewoon 1 nieuw shirt maken! De voorkant van de één en de achterkant van de ander!
Going through some old clothes, these two shirts caught my eye. Although I had kept them for different reasons there was something wrong with each of them. One didn't fit me anymore, but I liked the neckline, the other had an awful neckline and I really didn't care for the orange flower anymore. But I liked how the shirts combined and that's probably why it suddenly came to me: why didn't I turn this into one new shirt: combining the front of one shirt with the back of the other!
Stap 1
Van het eerste shirt, dat van Desigual was, vond ik de combinatie van blauw en paars erg mooi op de achterkant. Ik knipte de lange mouwen eraf en maakte de achterkant los van het voorpand. Tot zover de aanpassingen op dit shirt.
 |
| Mooie bloemen inspireren me enorm! (Oranje niet zo...) |
Stap 2
Om een idee te krijgen van een goede maat, gebruikte ik een patroon van een shirt. Het Desigual shirt was krap aan. En ik wist al dat het nopjes-shirt te klein was, maar dat werd pijnlijk duidelijk toen ik het op het patroon legde... Ik had het shirt in 2010 gekregen voor mijn vrijwilligerswerk bij I-did, een mooi sociaal merk dat vrouwen met een achterstand op de arbeidsmarkt een kans geeft en mooie producten maakt van gerecyclede materialen. Ik had goede herinneringen aan die tijd en het voelde goed om een shirt van gerecyclede stof nu zelf te recyclen.
Hoe dan ook, extra stof was hoog nodig na 10 jaar. Het achterpand kon me hiermee gelukkig uit de brand helpen!
 |
| How....did this ever fit me? |
Anyway, I obviously needed more fabric. Fortunately, I had the back piece to help me out there.
Stap 3
Ik besloot het voorpand breder te maken (mouw en zijnaad) met een strook van ca. 10 cm uit het achterpand. Dit knipte ik uit de linker- en rechter helft en naaide het weer links en rechts aan het voorpand. Ik nam de hierbij mouwen mee omdat het mouwtje ook niet heel wijd zat (lees: strak). Op de foto ziet het er nog vreemd uit, maar dit komt goed. Denk ik.

I decided to add a strip of fabric on each side. I cut the strips (about 10cm) out off the backpiece and then pinned and sew it back on the front piece. What you see in the picture above is the new fabric I can cut my pattern from. I also added fabric on the sleeves because they were a little too tight for my forty-plus-arms.
Stap 4
In dit stadium begon ik te twijfelen over het vervolg. Dit keer had ik alle stappen niet vooraf doorgedacht. Ik besloot uiteindelijk het achterpand, dat redelijk goed zat, als uitgangspunt te nemen. Door het achterpand op het voorpand te leggen, kon ik het model naknippen. Maar ik wist ook dat ik bij de taille en heup iets meer ruimte nodig had. Wat ik vervolgens deed, was puur een gok. Ik besloot de stof vanaf de oksel schuin weg te knippen naar de onderzoom, zoals je ziet op de rechterfoto. Ik hoopte dat dit aan elkaar genaaid ook mooi schuin weg zou vallen. 
Trust me, het komt goed!
At that point I started to doubt a little. Unlike other projects, I hadn't figured out every step up front. I decided to use the back as a pattern for the front. But I knew I needed more space from the waist down. So I took a risk. I cut the fabric from the armpits diagonal to the bottom hem (picture on the right). Hoping the fabric would fall nicely diagonal to the back.
Stap 5
Gokken is leuk, maar na het spelden past ik het resultaat op de paspop. Gelukkig zag dat er goed uit, dus naaien en afwerken maar!

To reassure myself I tried my pinned shirt on the tailors dummy before I started sewing. I wasn't disappointed, so I could start sewing and finishing the seams.
Stap 6
Zie je hoe goed de kleuren bij elkaar matchen? Nu had ik nog 2 dingen om te doen. De mouwen afwerken en, tot slot, vond ik het wel zo eerlijk om het label van I-did toe te voegen. Voortaan zouden Desigual en I-did samen in mijn nek kriebelen!
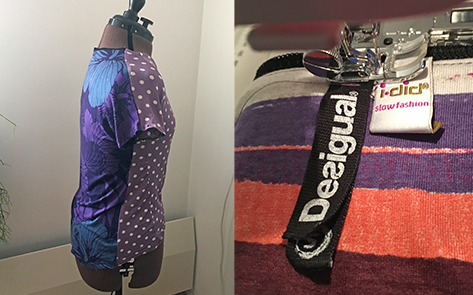 |
| Desigual meets I-did |
Finally, I had to finish the sleeves and add just one more detail... I felt the I-did label had equal rights to be in this shirt. So I added the label just beside the Desigual label.
Voor en na

Reacties
Een reactie posten