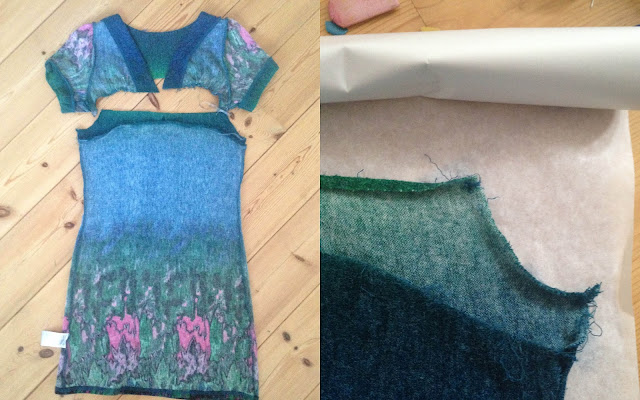
Misschien vraag je je af wat er mis is met deze jurk. Tenzij het je smaak niet is, want dan is het antwoord simpel;). Helaas paste de jurk me niet meer, de taille was te smal. Maar kijk die leuke mouwtjes dan, en de kleuren! De jurk is van het Spaanse hippe merk Lavand. Ik was er nog niet klaar voor om afstand van de jurk te nemen. Gelukkig kreeg ik een goed idee om er met een refashion een 2e leven aan te geven!
You may wonder what's wrong with this dress... Well, nothing actually. Except that it doesn't fit me in the waist anymore....small detail:) Too bad, 'cause I was really fond of the dress. Look at those cute sleeves, and the colours! The dress is designed bij the Spanish brand Lavand and I wasn't ready yet to say my goodbyes. Thankfully, I had a good idea how to give the dress a refashioned second live.
Stap 1
Ik begon met het lostornen van het bovenstuk. Zonder tornmesje ben je natuurlijk nergens.
 |
| Tornen zonder leesbril lukt me helaas niet meer... |
Stap 2
Et voilà, het bovenstuk was nu netjes losgemaakt van de rest van de jurk. Daarna tekende ik de vorm van het losgemaakte deel over op patroonpapier. Je ziet hier hoe ik de achterkant overnam, die ca. 2 centimeter is.
 |
Stap 3
Ook de aansluiting van de voorkant op het bovenstuk tekende ik over. Als je je afvraagt waarom ik niet simpelweg de jurk korter knipte: dat had weinig zin, want de taille was te krap. Ik had juist de wijdte nodig van de onderkant. En ik wilde graag de bloemenrand gebruiken! Nadat ik de vorm had overgetekend, kon ik het gebruiken om deze vorm 20cm lager opnieuw uit de stof te halen. Zo kon ik het precies weer laten aansluiten op het bovenstuk.
Stap 4
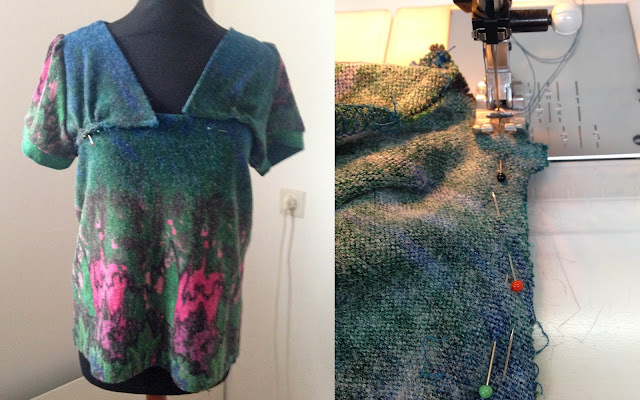
Nadat ik de voor- en achterkant opnieuw had uitgeknipt uit het onderste gedeelte van de jurk, was het een kwestie van opnieuw vastspelden. Ik heb mijn nieuwe top op de paspop afgespeld, zo kon ik goed zien of de plooitjes voor mooi vielen. En eindelijk mocht de naaimachine meedoen. Let trouwens niet op de richting van de naalden, het schijnt onvergeeflijk te zijn dat ik niet dwars op de stof speld, maar zo heb ik het van moeder geleerd en ik kan het niet meer afleren:)!
 |
| snorrrrrr.... |
Voor en na
En toen was mijn nieuwe top klaar. Ik draag het nog regelmatig, met een blauwe longsleeve eronder. Een lekker top in vrolijke kleuren. Van fijne comfy stof, lekker in het voor- en najaar. Welkom terug in mijn kledingkast! |
And there it was finished, my new comfy top. Ik wear it regularly with a blue longsleeve underneath. Hello again, happy colours!
|


Reacties
Een reactie posten